Half Square Quilt Using a Moda Scrap Bag Tutorial
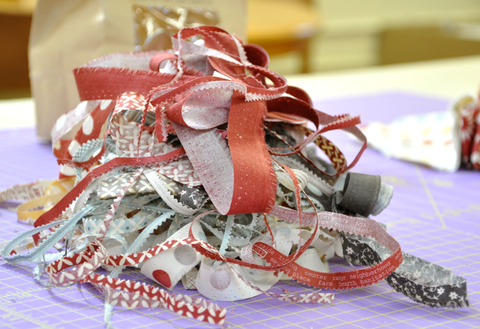
Moda is so clever, they release these awesome little Scrap Bags that give you a huge bang for your buck. Basically, Moda Scrap Bags are often the remnants of Moda precuts such as Layer Cakes and Charm Packs. Scrap bags have approximately 25 to 30 color coordinated 32" by 2" to 4" wide selvage strips of all cotton fabric. There is approximately a 1/2 pound of fabric in each bag.
![]()
I had a Hometown Scrap Bag in my collection for a little while now and thought it was time that I dug into it (actually I am obsessed with using Hometown in whatever project I can in case you didn't know...). A lot of people aren't sure what to do with the Moda Scrap Bags or the sheer potential of them so I wanted to share what I made with mine. I only used one Moda Scrap Bag and some Bella White for the background and Hometown fabric for the inner and outer borders. Yes, a quilt of this size used one, I repeat ONE Scrap Bag priced at $10.95 with some background and border fabrics! Fabulous...

Quilt Details:
Fabric: Hometown by Sweetwater for Moda
Batting: Wool by Quilters Dream <I love using wool batting!>
Thread: So Fine 401 (white)
Quilting Design: Swirling Feathers
So here we go -
Supplies needed:
- 1 Moda Scrap Bag (Hometown Scrap Bag)
- 2 1/4 Yards of a solid for the background (Bella Bleached White 9900-97)
- 5/8 Yard for Outer Border (Town Square in Sky 5460-13)
- 1/3 Yard for Inner Border (Market Place in Concrete 5467-25)
- 1/3 Yard for Binding (Preppy Plaid in Stop Sign 5466-12)
Tools:
- Ruler
- Rotary Cutter
- 90 degree ruler

Begin by laying your fabric out so you can see all the colors your working with.

Take each strip individually and cut off the selvage edge.

* Cut these the largest the strip will allow. Each strip can differ from 1" to 4" in width, don't worry about cutting the lengths the same size.
Step back and admire all the hard work on trimming you have done!

I sorted my strips in three different stacks, a small strip, medium strip and large strip stack.
Begin with matching the small to the large, when the smalls/or large strips run out (this will depend on the strip sizes your scrap bag came with), pair what is remaining to the medium strips.
* This is where you will want to match the colors together for the strips that your blocks will be made from, some colors play better with others. One other thing to note, there may be a strip or two that won't offer enough contrast with your background. I had two solid creme strips I left out due to them blending with the background and not giving the half square effect.

Sew the pairs of strips together using a 1/4" seam allowance. Measure the all the strip sets widths, note the smallest width strip set and cut all the other strip sets to that size. The smallest set I had was 3.5".
Cut your background color in the smallest strip set width, matching the quantity of strip sets you have.
In my quilt, all my strip sets were cut down to 3.5" by width of fabric (I did not trim the length), I had 20 strip sets. So I cut 20 - 3.5" strips out of my background material.

Placing right sides together of one strip set and one background piece, sew 1/4" seam allowance on both edges making a "tube".
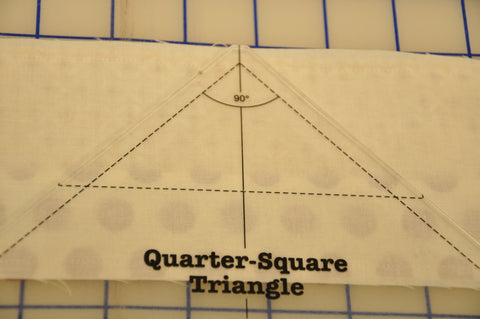
Line the 90 degree ruler tip to the top edge of the fabric. Rotary cut on the right side and left side against the 90 degree template ruler.
Set the triangle aside that was just cut.

Flip the strip over, matching the 90 degree ruler edge to the edge of the strip that was just cut.
Cut the left side, making another triangle. Repeat these steps until no more triangles can be cut.
I was able to squeeze five triangles out of each strip, only four are needed for this quilt since they will be sewn in pairs. I kept my scraps and made a cute little table topper.
Repeat steps above to all tube strips.

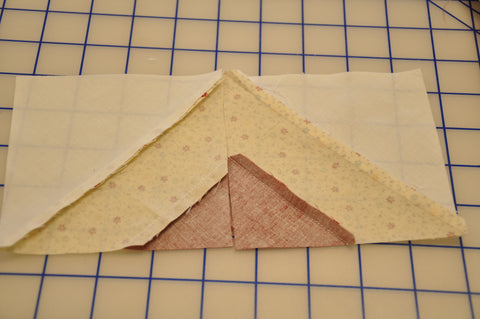
Here comes the counter intuitive part, take the seam ripper and take out the top few stitches in the tip of the triangle (I probably had 4-5 stitches to take out of each triangle)

Open the triangles, and you have your blocks! I love seeing progress!

Match the left side to the right side and place each block in a stack.
Pressing technique - press seams in opposite directions so seams can "lock" together when blocks are sewn together. Make sure each stack is consistently pressed the same direction so the blocks continue to lock seams. Looking at the stack with fabric facing up, my left side stack was pressed towards the background fabric, and my right stack was pressed away from the background fabric.

Now that the blocks are pressed and will lay flat, square up the blocks so they are all the same size. I squared all my blocks to 4.5".

Match seams, locking in place, pin and sew. Repeat for all block sets.

Lay the blocks in a pleasing pattern. I was able to get 5 blocks across and 12 blocks down.
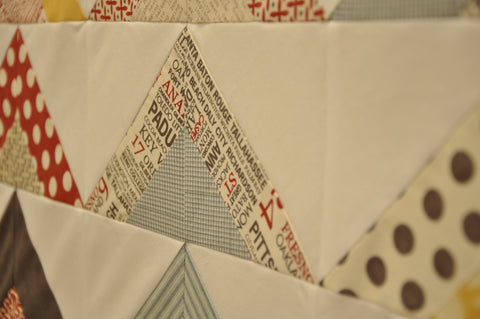
Sew the the blocks together in rows, followed by sewing the rows together.
Sew the inner border and outer border.

Quilt as desired. Besides putting on that pesky binding, your quilt is now finished!
Jenn
Owl Purse
What to do on a Saturday? I needed a change of pace so I decided to throw this little purse together. It's a fairly quick project and only requires about 2/3 yard of each fabric for the exterior and lining of the purse. Check out the tutorial I followed for this reversible bag. I had this owl fabric at home and thought it would be the perfect fabric for the exterior of my purse.
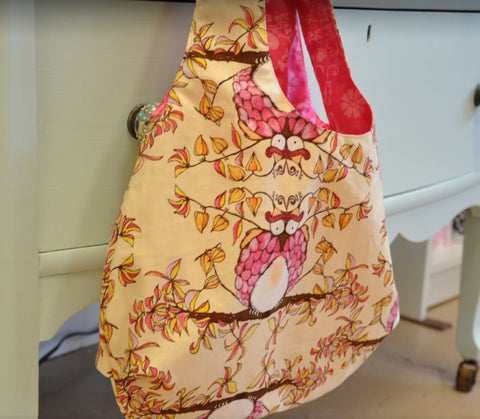
Doesn't she have the cutest face? Her name is Opal (Opal Owl by Tina Givens for Free Spirit).

To really spice things up, I decided to throw in a zippered pocket. I'm really stepping outside my normal zone with this one. All in all things went pretty well. The pocket is just the right size for my phone.

Look what found it's way in my purse, I think it's trying to tell me it wants to go home with me! I could fit about six of these lovely VIntage Modern jelly rolls in here...
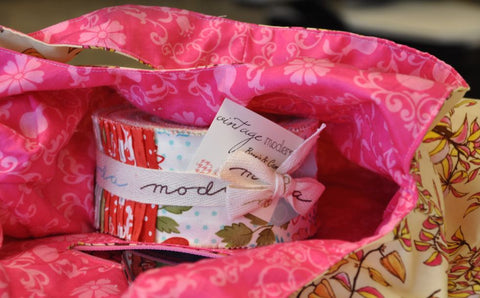
One down, one to go - you know Mother's Day is tomorrow... hint hint
Jenn
May Design Sale
Hard to believe it's already May!! Bring in your quilt during the month of May and receive 20% any of the designs shown below.

Love this design, the butterflies make it light and fun! It's called butterflies and swirls.

This design is called cotton puffs, it stitches out beautifully.

This design is called crazy arcs. The arcs and swirls make this design a great option for the quilt that has all those sharp angles, great for t-shirt quilts and charm square quilts.
Hurry in before May escapes and June is here with new designs!
Jenn
Gift Tag Tutorial
Want to dress up a package without spending a lot of time on it? I think this is the quickest and cutest little package. I have about every color in felt known to man... so the choices are really endless.

Supplies:
- scraps of heat and bond (mine were about 3" x 3" for each letter)
- scraps of fabric/felt for the lettering (mine were about 3" x 3" for each letter)
- scraps of felt for the circle (for the cirlcle I made you would need about a 3.5" x 3.5" square for each circle)
Step one:
Select the felt you will use for the circle.
FInd a template to trace the circle, mine was a 3" ring that I just happened to have lying around.

Trace the outer ring to make the circle.

Step two:
Cut out the felt cirlce for the base of the tag.
Step three:
Select the letter of your choice and print out on paper so it can be traced.
*Tip: I went on Microsoft Word and enlarged a letter of my liking (font is called "Lobster") and inverted it. A light box can be used if you don't print it inverted.
Place heat and bond over letter with smooth side facing up. Trace letter with pen or pencil.

Step four:
Cut out the letter traced on heat and bond, cut roughly 1/4" all the way around the outline.
Step five:
Place heat and bond rough side facing down on the wrong side of the fabric. The rough side of the heat and bond will stick to the fabric when ironed.

Step six:
Cut on the drawn line of the heat and bond around your letter.
Peel the paper side of the heat and bond off.
Step seven:
Place letter, fabric side up on top of the felt circle.
Press to make permenant hold.
*Tip: Use pressing sheet anytime when ironing felt. Never put iron directly on felt.
Here is your new package tag - made in no time at all! Can you guess what's in these lovely packages?

Burp Clothes


Home Table Runner
Hometown by Sweetwater has to be one of my favorite lines (although I think I say that everytime I see a new line from them...). I had the perfect project picked out to feature the fabric and luckily I had some extra time to sew this weekend.


Sassy Flying Geese
Remember all these flying geese? Well, I have one small table topper done, and only about 1,000 flying geese remaining! I do love using all my scraps, but I think I will have take a small break and come back to the rest of the flying geese. I'm feeling like something, well anything other than flying geese right now!
Here's how it turned out, I'm quite happy with it. It's a great size for a patio table - I can picture it now, me and my quilt relaxing in the shade with a cold glass of lemonade...

This little table topper was made with less than one charm pack, and did I mention still plenty of flying geese left?

This beautiful fabric is from the Sassy line by Sandy Gervais. We have precuts and yardage available, it's the perfect line for summer. It would also make a darling apron with the fruit pattern!
Jenn