Quilt as you go Technique
Posted on October 08, 2012 by Jenn Thurston | 5 comments
We are doing a small casserole carrier for an upcoming class and thought it would be helpful to write a post about the "quilt as you go" technique. So here is what you will need for supplies:
Batting
Backing
Strips - jelly rolls are very convenient for this process! (but varied widths work just as well)
Coordinating thread (the thread will only show up on the backing)
Walking Foot
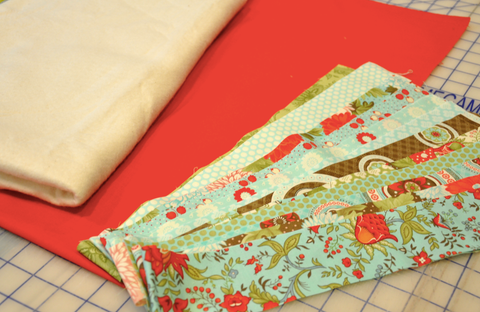
Here is the fabric we have selected, batting, backing and strips.

Fabric is the lovely Bliss by Bonnie and Camille.

Lay backing with wrong side up, place batting on top of backing. We have our batting slightly larger than our backing to allow for any shrinkage during quilting.

Find the middle of your backing, place one strip of fabric directly in the middle right side up.

Place the strip that will be featured next to it, right sides together.
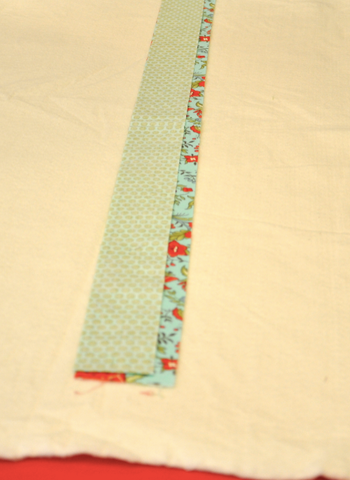
Here is another view. Right sides together, ready to be sewn.

Pin in place to prevent shifting during sewing.

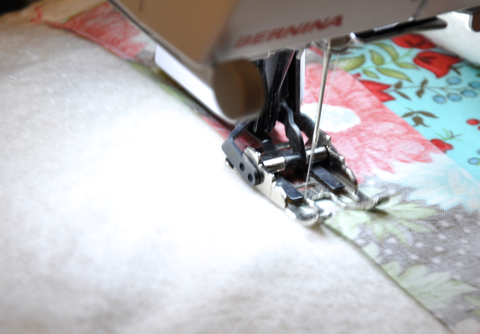
Sew with right sides together, 1/4" seam allowance. We recommend using a walking foot, this has multiple layers of fabric and the walking foot will prevent shifting as you sew.

We placed a pin at the top of the quilt to know which side we began sewing on, with each strip you add you want to start on the opposite end of your last strip. This prevents pulling and shifting when quilting, making it more even.

Open strips, quickly press open with the iron making sure not to let the iron stay in one place to long.

Continue with placing your next strip right sides together to the strip just sewn.
Stitch a 1/4" seam allowance, remember to start from the opposite end of the previous strip. (Opposite end from where you placed your marking pin)

Press open, repeat steps until all your strips have been sewn on one side.

Begin sewing your strips on the opposite side. Place right sides together, pin, sew 1/4", press open and repeat until the other side of strips are finished.

Trim down and as your pattern requires.
And there you have it - all strips have been quilted as you go!
Posted in bliss, bonnie and camille, quilt as you go, tutorial
Subscribe Follow Us
Recent Articles
-
Strip Quilt Featuring Moda Scrap Bags Tutorial
May 03, 2019
-
Tutorial - Hour Glass Block
February 28, 2019
-
UFO Friday - Block of the Month Houses
May 05, 2017
-
UFO Friday - Tinker Tote Finish
April 28, 2017
-
UFO Friday - Tinker Tote Continuation
April 14, 2017
Categories
- 20% off (0)
- 90 degree ruler (0)
- a childs place (0)
- A Graceful Winter (1)
- a swine evening (0)
- agf (0)
- Allie Owl (1)
- art gallery (0)
- art gallery fabrics (0)
- article (0)
- Aviary 2 (0)
- baby (0)
- baby gift (0)
- baby gifts (0)
- baby quilt (2)
- baby quilts (0)
- Baby Shower (0)
- Basic Grey (0)
- basicgrey (0)
- Bats (1)
- Bella Solids (0)
- bespoken (0)
- Birds (0)
- Blanket (0)
- Blend (0)
- blend fabrics (0)
- bliss (0)
- bloc loc (0)
- Block of the Month (0)
- block-a-thon (0)
- blocloc (0)
- Blog Hop (1)
- Boat House (1)
- Boho (0)
- bonnie and camile (0)
- Bonnie and Camille (7)
- bonnie christine (0)
- breast cancer (0)
- breast cancer quilt (0)
- brushed cotton (0)
- bungle jungle (0)
- burp clothes (0)
- Butterflies and Daisies (1)
- Cake Mix Recipes (1)
- camille roskelley (0)
- candies (0)
- Caravan Pouch (0)
- Caravan Tote (0)
- Cargo Duffle (1)
- Chalk and Paint (1)
- challenge (0)
- charity (0)
- charity quilt (0)
- charity quilts (0)
- charity sewathon (0)
- Charlotte Modern Quilt Guild (1)
- charm packs (0)
- charm squares (0)
- charms (0)
- chevron (0)
- christmas (0)
- Christmas Quilts and More (1)
- cinch bag (0)
- CMQG (1)
- cosmo cricket (0)
- Cotton and Steel (0)
- Countdown to Christmas (0)
- Cultivate Blog Tour (1)
- Cultivate Fabrics (1)
- Daysail (1)
- Dear Stella (1)
- Dessert Roll (0)
- disa designs (0)
- disappearing four patch (0)
- Dish towel (0)
- display (0)
- dog (0)
- dresden plate (0)
- Dwell Mini (1)
- economyblock (0)
- economyblockalong (0)
- embroidery designs (0)
- fabric (0)
- fabric basket (0)
- Fancy Fox (1)
- Fandango (0)
- Farmhouse (1)
- Fat Quarter Shop (1)
- Feather N Stitch (0)
- felt (0)
- Festive Flurries (1)
- fight like a girl (0)
- Firecracker (0)
- flannel (0)
- flirt (0)
- Flowering Snowball (0)
- flying geese (0)
- Forms (0)
- Free Pattern (0)
- Free Spirit (0)
- Free Spirit Fabrics (0)
- Fresh Cut (0)
- Fresh Cut Fabric (0)
- Gift (0)
- gift tag (0)
- Gigi's Thimble (1)
- Glimmer (0)
- goody goody binding bag (1)
- Goody Goody Binding Kit (1)
- Gooseberry (1)
- Gooseberry Fabric (0)
- Grand Finale (0)
- grand opening (0)
- half square triangles (0)
- half squares (0)
- Halloween (1)
- handmade (0)
- happy go lucky (0)
- Harvest Home (1)
- Hatchet (0)
- Hatchet Ruler (1)
- Hazelwood (1)
- hearts (0)
- Hearty Meander (1)
- heather bailey (0)
- Hello Bear (0)
- hello luscious (0)
- herrignbone (0)
- Hexagon (0)
- Hip Holiday (0)
- holiday (0)
- hometown (0)
- Honey Honey (0)
- honeycomb (0)
- Houses (1)
- inspiration notebook (0)
- Jack (1)
- Japan (0)
- Jay Bird Quilts (0)
- Jaybird Quilts (1)
- Jellybean (5)
- Joel Dewberry (0)
- Johanna Masko (1)
- jovial (0)
- joy (0)
- julie comstock (0)
- Kaleidoscope (0)
- Kate Spain (0)
- Kit (2)
- Large Block (0)
- lazy angle (0)
- lazy angle ruler (0)
- Lella Boutique (2)
- Lila Tueller (0)
- Longarm (0)
- Longarm Quilting (0)
- Love (0)
- lucys crab shack (0)
- Magazine (1)
- Magnetic Closure (0)
- marmalade (0)
- Melody Miller (0)
- mini charms (0)
- Mini Dwell (1)
- minimalista (0)
- Miss Kate (1)
- Miss Rosie's Quilt Co (1)
- mitered corners (0)
- Mixer (1)
- Moda (0)
- Moda Fabric (0)
- moda fabrics (0)
- Moda Farbrics (0)
- moda scrap bags (0)
- modafabrics (0)
- Modern (0)
- Mon Ami (1)
- monica lee (0)
- mug rugs (0)
- Mustang Fabric (0)
- my runners (0)
- Mystery Quilt (0)
- newsletter (0)
- Noodlehead (1)
- Northcott (0)
- now we're goin places (0)
- number quilt (1)
- odds and ends (0)
- Oh Happy Day (1)
- ombre (0)
- One Caone Two (1)
- opal owl (0)
- ornaments (0)
- owls (0)
- paisley (0)
- panel (0)
- paper pieced (0)
- paperpieced (0)
- Papillon (0)
- patriotic (0)
- piece and challenge (0)
- Piece and Comfort Challenge (0)
- Piece Tree (1)
- pillow (0)
- Pillow Covers (1)
- Pillow Hound (0)
- pillows (0)
- pineapple block (0)
- Pinwheels 4 (1)
- pirate (0)
- Polaroid Quilt (1)
- Postcards from Sweden (1)
- Project Bag (1)
- Puddle Jumping (0)
- pure (0)
- purse (0)
- quilt (0)
- quilt as you go (0)
- Quilting (0)
- quilts (0)
- Quilts and More Magazine (1)
- rail fence (0)
- rectangle (0)
- red white & brave (0)
- red white and brave (0)
- Red White and Free (0)
- redpepperquilts (0)
- remnants (0)
- reunion (0)
- ribbons (0)
- ric-rac (0)
- riley blake (0)
- ruby (0)
- ruffles (0)
- ruler (0)
- Rustique (1)
- Safari (0)
- sale (0)
- salt air (0)
- Sampler (1)
- Sandy Gervais (0)
- Sarah Watts (0)
- sassy (0)
- schnibbles (0)
- scrapfabric (0)
- scrappy (0)
- Scrappy Log Cabin (1)
- scraps (0)
- Seaside (1)
- self binding baby blanket (0)
- selvage (0)
- selvages (0)
- Serenade (0)
- sew modern baby (1)
- Sew Scary (1)
- Sewing (0)
- Sewing 101 (0)
- sewing classes (0)
- Sidekick Ruler (1)
- sneak peak (0)
- Solids (0)
- spending time together (0)
- Spirit (0)
- Spring (0)
- Stars and Loops (1)
- stitch in color (0)
- store (0)
- straight stitch (0)
- string quilt (0)
- Sunburst Quilt (1)
- Super Sidekick Ruler (0)
- surprises (0)
- sweet as honey (0)
- Sweetwater (1)
- Swirl Quilting (0)
- swirls 3 (1)
- swoon (0)
- table topper (0)
- Take-Along Trio (1)
- Thankful (0)
- Thanks (0)
- Thanksgiving (0)
- The Beatle Bag (1)
- The Boat House (4)
- The Cookie Exchange (1)
- thimble blossoms (0)
- thought of the day (0)
- Tim and Beck (0)
- tina givens (0)
- Tinker Tote (3)
- tips and tricks (0)
- toddler quilt (1)
- trees (0)
- Triangle Pillow (0)
- tutorial (0)
- type (0)
- typewriter (0)
- UFO (3)
- UFO Fridays (5)
- UFOFridays (6)
- UFOs (0)
- up parasol (0)
- urban chiks (0)
- urbanchiks (0)
- v and co (0)
- valentines (0)
- vintage christmas (0)
- Vintage Modern (1)
- wee ones (0)
- welcome (0)
- wild thing (0)
- wonky block (0)
- wonky stars (0)
- wool (0)
- yardage (0)
- Zippers (0)
- Zippy Pouch (0)