Half Square Quilt Using a Moda Scrap Bag Tutorial
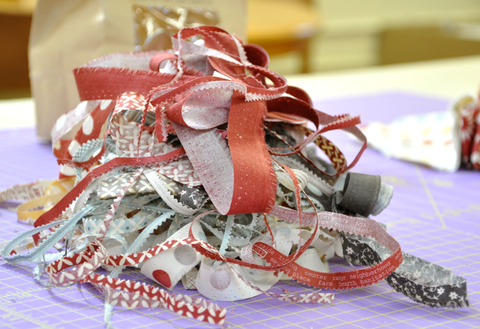
Moda is so clever, they release these awesome little Scrap Bags that give you a huge bang for your buck. Basically, Moda Scrap Bags are often the remnants of Moda precuts such as Layer Cakes and Charm Packs. Scrap bags have approximately 25 to 30 color coordinated 32" by 2" to 4" wide selvage strips of all cotton fabric. There is approximately a 1/2 pound of fabric in each bag.
![]()
I had a Hometown Scrap Bag in my collection for a little while now and thought it was time that I dug into it (actually I am obsessed with using Hometown in whatever project I can in case you didn't know...). A lot of people aren't sure what to do with the Moda Scrap Bags or the sheer potential of them so I wanted to share what I made with mine. I only used one Moda Scrap Bag and some Bella White for the background and Hometown fabric for the inner and outer borders. Yes, a quilt of this size used one, I repeat ONE Scrap Bag priced at $10.95 with some background and border fabrics! Fabulous...

Quilt Details:
Fabric: Hometown by Sweetwater for Moda
Batting: Wool by Quilters Dream <I love using wool batting!>
Thread: So Fine 401 (white)
Quilting Design: Swirling Feathers
So here we go -
Supplies needed:
- 1 Moda Scrap Bag (Hometown Scrap Bag)
- 2 1/4 Yards of a solid for the background (Bella Bleached White 9900-97)
- 5/8 Yard for Outer Border (Town Square in Sky 5460-13)
- 1/3 Yard for Inner Border (Market Place in Concrete 5467-25)
- 1/3 Yard for Binding (Preppy Plaid in Stop Sign 5466-12)
Tools:
- Ruler
- Rotary Cutter
- 90 degree ruler

Begin by laying your fabric out so you can see all the colors your working with.

Take each strip individually and cut off the selvage edge.

* Cut these the largest the strip will allow. Each strip can differ from 1" to 4" in width, don't worry about cutting the lengths the same size.
Step back and admire all the hard work on trimming you have done!

I sorted my strips in three different stacks, a small strip, medium strip and large strip stack.
Begin with matching the small to the large, when the smalls/or large strips run out (this will depend on the strip sizes your scrap bag came with), pair what is remaining to the medium strips.
* This is where you will want to match the colors together for the strips that your blocks will be made from, some colors play better with others. One other thing to note, there may be a strip or two that won't offer enough contrast with your background. I had two solid creme strips I left out due to them blending with the background and not giving the half square effect.

Sew the pairs of strips together using a 1/4" seam allowance. Measure the all the strip sets widths, note the smallest width strip set and cut all the other strip sets to that size. The smallest set I had was 3.5".
Cut your background color in the smallest strip set width, matching the quantity of strip sets you have.
In my quilt, all my strip sets were cut down to 3.5" by width of fabric (I did not trim the length), I had 20 strip sets. So I cut 20 - 3.5" strips out of my background material.

Placing right sides together of one strip set and one background piece, sew 1/4" seam allowance on both edges making a "tube".
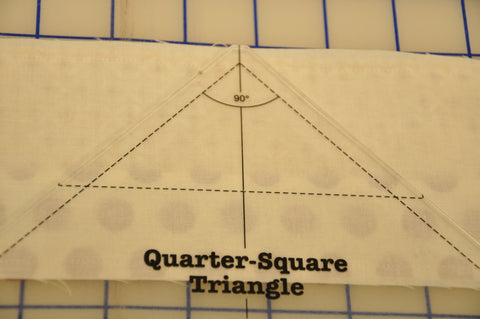
Line the 90 degree ruler tip to the top edge of the fabric. Rotary cut on the right side and left side against the 90 degree template ruler.
Set the triangle aside that was just cut.

Flip the strip over, matching the 90 degree ruler edge to the edge of the strip that was just cut.
Cut the left side, making another triangle. Repeat these steps until no more triangles can be cut.
I was able to squeeze five triangles out of each strip, only four are needed for this quilt since they will be sewn in pairs. I kept my scraps and made a cute little table topper.
Repeat steps above to all tube strips.

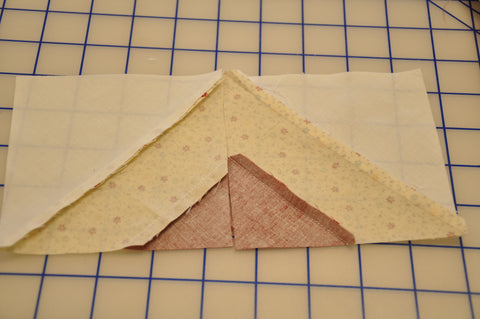
Here comes the counter intuitive part, take the seam ripper and take out the top few stitches in the tip of the triangle (I probably had 4-5 stitches to take out of each triangle)

Open the triangles, and you have your blocks! I love seeing progress!

Match the left side to the right side and place each block in a stack.
Pressing technique - press seams in opposite directions so seams can "lock" together when blocks are sewn together. Make sure each stack is consistently pressed the same direction so the blocks continue to lock seams. Looking at the stack with fabric facing up, my left side stack was pressed towards the background fabric, and my right stack was pressed away from the background fabric.

Now that the blocks are pressed and will lay flat, square up the blocks so they are all the same size. I squared all my blocks to 4.5".

Match seams, locking in place, pin and sew. Repeat for all block sets.

Lay the blocks in a pleasing pattern. I was able to get 5 blocks across and 12 blocks down.
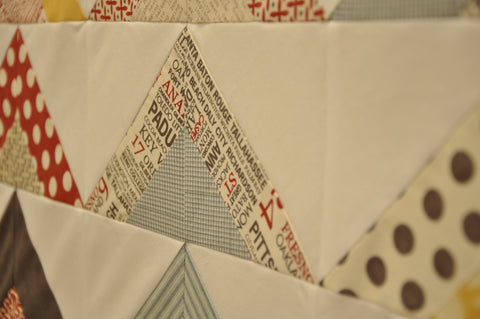
Sew the the blocks together in rows, followed by sewing the rows together.
Sew the inner border and outer border.

Quilt as desired. Besides putting on that pesky binding, your quilt is now finished!
Jenn