Ombre Fabric


Thinking about a dear friend
We were recently told the news that one of our dear sewing friends had Breast Cancer, reoccurring at that. Our last call group decided we should make a quilt for her recovery. We were each given one solid block of white background and a ribbon template. We could use whatever pink fabric we wanted to and write a special message to our friend Ruth.
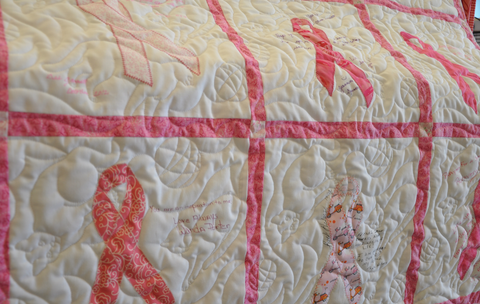
Everyone's different pink fabrics were so fun to see! Not one was similar looking to another.

Such sweet, inspiring messages on every single block!
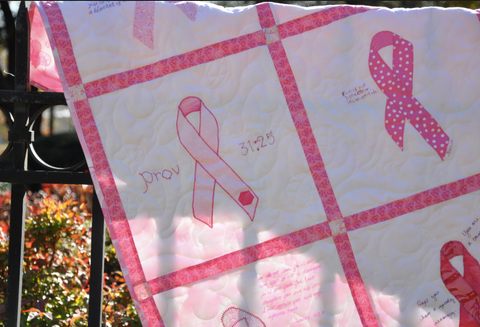
Each block had it's own special touch to remind her of each one of us.
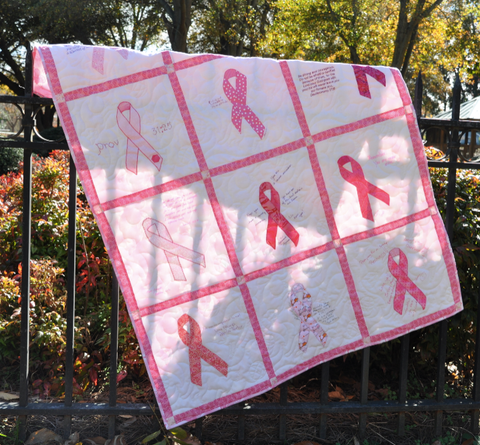
We will be thinking about our dear friend Ruth and wish her a speedy recovery!
Quilted Thimble Cottage
Granny Square Happiness
Have you noticed Granny Squares are everywhere in the quilting world? I definitely have noticed, and I've been dying to make a block or two. So go figure, I had some scraps left over from a previous quilt (if there is one thing I can tell you about myself, it's that I hate to see my fabric scraps go to waste and sit in a dark closet all by their lonesome). So I made a block, and really loved how it turned out. So I kept at it and made this small baby quilt for some friends of ours.

The line is Vintage Modern by Bonnie and Camille.

Here's a close up of the embroidery. Charlee Ann such a sweet name that I had to put it in a fun whimsical font.

One of my favorite features of this quilt is using different color strips for the binding, no two strips are the same giving it such a playful feel. (Also goes back the fact I avoid putting anything in my scrap basket!)

One last picture... I used floppy daisy as the quilting design with a white thread to not take away from the quilt. I thought with the bright colors in the fabric the design was perfect. I hope little Charlee enjoy's her new quilt!
Jenn
Happy Halloween


We have some exciting news!
|


Quilt as you go Technique
We are doing a small casserole carrier for an upcoming class and thought it would be helpful to write a post about the "quilt as you go" technique. So here is what you will need for supplies:
Batting
Backing
Strips - jelly rolls are very convenient for this process! (but varied widths work just as well)
Coordinating thread (the thread will only show up on the backing)
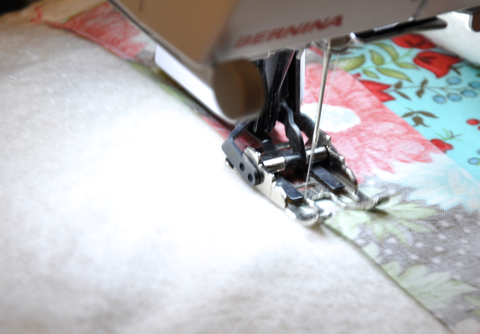
Walking Foot
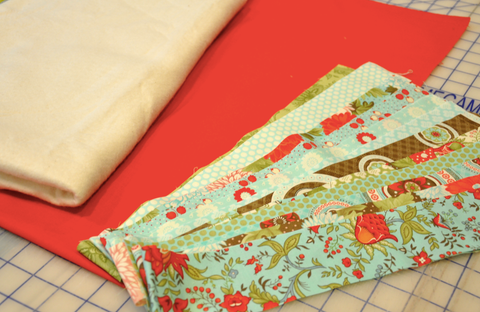
Here is the fabric we have selected, batting, backing and strips.

Fabric is the lovely Bliss by Bonnie and Camille.

Lay backing with wrong side up, place batting on top of backing. We have our batting slightly larger than our backing to allow for any shrinkage during quilting.

Find the middle of your backing, place one strip of fabric directly in the middle right side up.

Place the strip that will be featured next to it, right sides together.
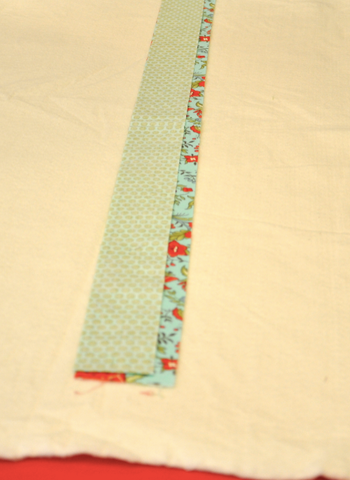
Here is another view. Right sides together, ready to be sewn.

Pin in place to prevent shifting during sewing.

Sew with right sides together, 1/4" seam allowance. We recommend using a walking foot, this has multiple layers of fabric and the walking foot will prevent shifting as you sew.

We placed a pin at the top of the quilt to know which side we began sewing on, with each strip you add you want to start on the opposite end of your last strip. This prevents pulling and shifting when quilting, making it more even.

Open strips, quickly press open with the iron making sure not to let the iron stay in one place to long.

Continue with placing your next strip right sides together to the strip just sewn.
Stitch a 1/4" seam allowance, remember to start from the opposite end of the previous strip. (Opposite end from where you placed your marking pin)

Press open, repeat steps until all your strips have been sewn on one side.

Begin sewing your strips on the opposite side. Place right sides together, pin, sew 1/4", press open and repeat until the other side of strips are finished.

Trim down and as your pattern requires.
And there you have it - all strips have been quilted as you go!
Scrappy String Quilt
I'm in love with this Lucy's Crab Shack fabric by Sweetwater. I was making a quilt (to be revealed at a later date...) and had all these tiny strips remaining measuring between 3/4" to 1 1/4". I actually threw them in the trash, I kept looking at them thinking what could I possibly do with these...

I have always wanted to make one of those string quilts so I figured what the heck - I'm gonna try with these tiny strips. And what do you know... it was actually enough fabric to make this cutie patootie table runner!

I used the foundation piecing method, it worked wonderfully. Just be very careful when peeling the paper off the back not to stretch the fabric since it's on the bias!

The back is just as fun as the front, I pieced my scraps that weren't used on the front to break up the solid backing. The quilting pattern is a fun feather looking pattern that has a cool interlocking swirl look.

From start to finish this quilt was a lot of fun to make! I would even say it went pretty quick... the size is perfect for a night stand or coffee table.
Jenn