Economy Block Quilt Along
Have you seen any of those adorable economy blocks? I first saw them on instagram (if you're on instagram, make sure to say hello to me! My username is jennthurston ) and couldn't believe how cute those blocks were!
Red Pepper Quilts has a paper pieced pattern as well as directions for traditional piecing. Make sure to check out her site, the colors she selected are so vibrant!
I decided to use the paper piecing method instead of the traditional route. We sell this awesome light weight paper called Carol Doak's Foundation Paper for paper piecing, it can be put through the printer or traced. I absolutely love it and use it whenever I paper piece!

I also decided on using my scraps since I have so much of them! These are my first four blocks -

I can't wait to make more, I'll have to make a whole lot of economy blocks to use up all my scraps!
Jenn
Boho Tidibit
Have you tried one of the Little Bites patterns from Miss Rosie's Quilt Co.? They are so much fun! All of the Little Bites feature using Moda Candies (if you're not familiar with them, you must check them out, they are a smaller, oh so cute version of a charm pack measuring 2.5" x 2.5").

This quilt is made from the pattern called Tidbit. She features three different versions of the pattern. I made the top one, but decided to add colorful borders instead of the solid background color.

The little candie pack was so fun to use, I usually don't make small quilts but I really enjoyed this one! Her techniques were great, and really cut down on individual piecing.

Here's a picture of the back. So, a fatquarter isn't quite large enough for a backing... sooooo I cut what little scraps I had remaining and used them to splice the back to make it just big enough (and boy do I mean just big enough!). Don't get me wrong, I love scraps and making more projects from them, but I feel so accomplished when I can use all the fabric I have in one quilt!

So there you have it, you must put it on your list of adorable small quilts to make!
Jenn
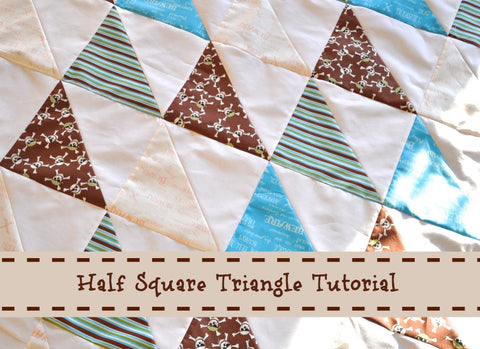
Half Square Triangle Tutorial
I'm sure almost everyone out there in the quilting world already knows how to make a half square triangle block. There's nothing fancy to making one, but they are in oh so many beautiful blocks! So if you don't know how to make them, today is your lucky day! I was making another quilt to add to the collection for our Charity Quilts, and thought a half square quilt would be a really quick and easy quilt to make. Here's a quick tutorial on how to make half square triangle blocks.
Details of our quilt:
Size: 43" x 52"
We used four different colors (if you like the fabric we used, it's called Pirates by Riley Blake, such a cute boy quilt fabric which can be so hard to find sometimes!)
Colored Blocks: One 10" strip WOF (width of fabric) of each four colors. Cut these into 10" x 10" blocks, you will have a total of four 10" x 10" squares of each color.
Background Blocks: 1 1/4 Yard. Cut 16 10" x 10" squares.

- Mark a diagonal line down the center of the background blocks.
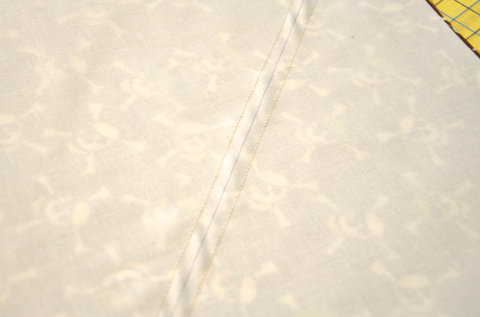
- Sew a 1/4" seam down both sides of the line you just marked.

- Cut on the center line.

- Press the seam towards the dark fabric.

- Align the diagonal line of ruler on the diagonal sewing line, trim the top and right side of the block.

- Flip the block to trim the other two sides, we trimmed our block down to a 9" block.

There you have it, it's that easy to sew and trim half square triangles! Now you just need to decide on your quilt layout, which may sound easier than it really is with all those choices... diamonds, chevron, diagonal lines... so many layout choices!
Jenn
Hugs and Kisses
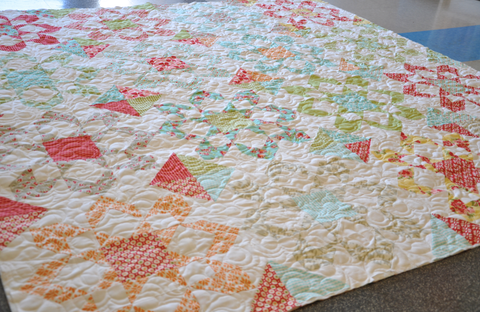
A couple weeks ago we had a customer come in searching for blue, orange and green fabrics. She was going to make a quilt for a wedding gift. We were so pleased when she brought in the finished quilt top for us to quilt! I love seeing final projects our customers have made.

The pattern is called Hugs and Kisses by Jay Bird Quilts. It uses my favorite ruler ever, The Lazy Angle Ruler. Easy to use, quick projects, endless deigns. If you haven't heard of it before, look it up, you won't be disappointed! You may remember this Summersville Spring quilt I made with it.

We went with an abstract vine quilting design. One of our favorites, not too stitch intensive to take away from the design of the quilt.

I love all how all the blues, greens and oranges she selected play so nice together! It's amazing to me how almost none of these fabrics are from the same line, but sticking to three colors gives it such a nice cohesiveness.
Jenn
Fireworks Quilt
There are so many lovely quilts that I wish I had time to make, but let's be real... there's not enough time in the day to make every quilt that I want to. Lucky for me we longarm, so I'm fortunate enough to be able to live through other peoples quilts. Emily recently brought in her quilt she made for her mom's birthday. (Lucky mom!)
The pattern is Firecracker by Thimble Blossoms.

She used a balanced mix between Vintage Modern, Ruby and Marmalade.
The quilt turned out so nice and cheery, we quilted it with a feather design.

Now that I think about it, I'm not sure if it helps me seeing this beautiful quilt done or not, I now have a overwhelming urge to make one myself! Oh well for that theory...
Jenn
Summersville Spring
Have you seen the new line out by Lucie Summers called Summersville Spring? It looks exactly how it sounds; warm spring days, birds chirping, butterflies fluttering by... it's the perfect fabric for the last gloomy days of winter. In fact, the rare occurrence of when we got snow I decided to sew this bright, cheery quilt while it was blowing flakes like crazy outside.
I have to admit, I really did enjoy the beautiful evening of snow we had. So pretty, and it was the perfect snow for snow balls! I also have to admit I was happy to see it leave the next day.

This quilt was so easy to put together! It just takes 2.5" strips so it's prefect to use that jelly roll that you've had your eye on! Best part is, a small size like this one only takes half a jelly roll... soooo, you could make a large one or two small ones!

The pattern is called Unwind, it uses that fantastic Lazy Angle ruler that I'm in love with! In fact, this is my third pattern using the Lazy Angle ruler. I suggest you check it out, you won't regret it!

I used a quilting pattern called meandering feathers. It's fantastic, just the right amount of space left between the feathers. This won't be the last time you see me use it!

I had so much fun making this! I will be keeping this pattern in mind for my next baby quilt I need to make.
Jenn
Wonky Block Tutorial
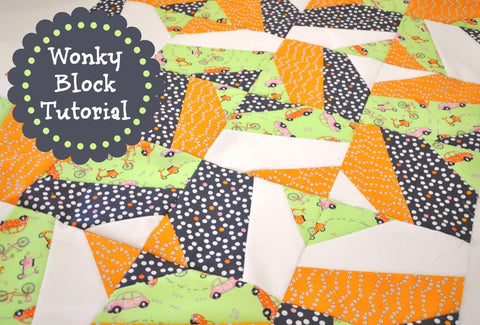
I love making these wonky blocks for quick baby quilts and charity quilts! So here's a tutorial on how I make them.
What you will need to make the featured 31" x 46" quilt:
- Fabric - 10" x WOF (width of fabric) of six different colors
(we used four colors, cut 20" x WOF and this made two of these quilts!)
- Rotary Cutter
- Ruler
- Coordinating Thread
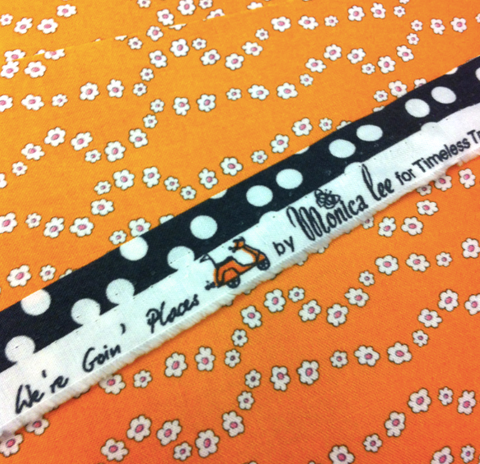
* Featured fabric is Now We're Goin' Places by Monica Lee (excuse all my iPhone pictures)
Step one: Cut 24 10" x 10" squares.
Step two: Layer four 10" x 10" squares in a stack.

Step three: Lay ruler at an angle,
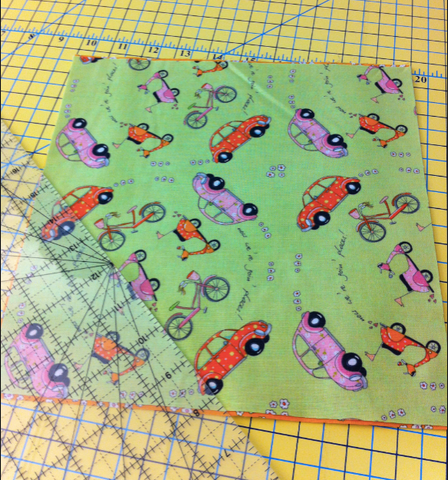
Step four: Cut so there are four sections.

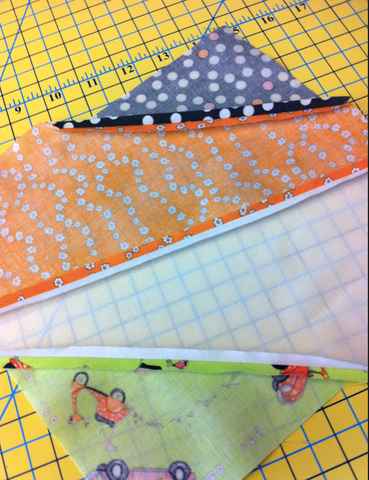
Step five: Place cut pieces in desired layout (we selected to have one color in each block, you could always double up on colors too!)

Step six: Sew cut pieces together and press seams open.
Step seven: Block will have jagged edges from the cut angles. Square up block, we started with 10" x 10" square, our squared up block measures 8.5" x 8.5".

Step eight: Place blocks in desired arrangement.

Final quilt should have four blocks across and five blocks down if you are using the 24 10" x 10" blocks.

Hope you enjoy making them as much as I do! We would love to see some pictures of ones you make, find us on facebook or e-mail us at admin@quiltedthimblecottage.com
Jenn