A Graceful Winter
With the 70 degree weather we've been having, you would never guess it's mid November! I know the cold will be coming soon enough, but for now I will admire this beautiful Graceful Winter quilt.
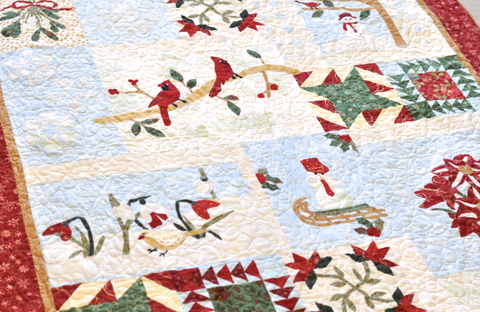
A nice design of snowmen, birds, winter flowers and fun embellishment makes this quilt spectacular.

I just love the snowman's hat, makes me think of Michael Jackson's hat with all those shiny embellishments!

How can you turn away from this snowman, such a cute little face!

Details:
Fabric: Variety of fabric (Kit is available)
Pattern: A Graceful Winter by Denise Sheehan
Size: Approximately 49" x 51"
Want us to longarm a quilt for you? Here are just some of the quilts we have longarmed, and we have an easy estimate form to give you an idea on pricing.
UFO Friday - Bonnie and Camille Scrappy Log Cabin In Progress
It's Friday! It's rather gloomy and quiet in Belmont today (and warm, did I mention it's 70 degrees on November 6th?!) I'm picking up where I left off last week with my Bonnie and Camille Scrappy Log Cabin!

Last week all I had were my blocks cut into quarters, this week I'm proud to say that all 49 have been squared up and sashing sewn. I wanted them sewn on point, so I added a solid 2-1/2"light blue sashing around each block.
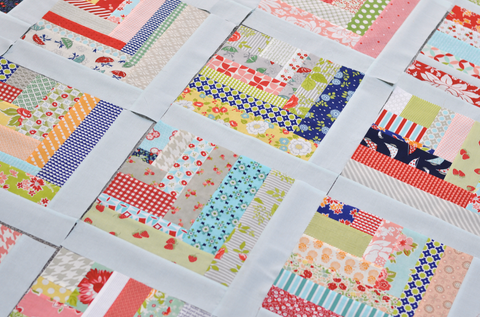
I was hoping I would have them sewn in rows, but no such luck. I'm happy that I made as much progress as I did, I should be able to sew these into rows next Friday!
Don't forget, you can join in on the fun! Post your photos on Instagram or on our Facebook page, use hashtag #UFOFridays
Project details:
Pattern: Scrappy Log Cabin
Fabric: Every and any collection from Bonnie and Camille
What's in Your Bag?
I was recently in an online swap run through Instagram, this swap's focus is on Bonnie and Camille fabric. I made a mini quilt and filed the rest of the package with some cute stuff like stationary, taffy from the east coast of North Carolina and some chocolate of course. So what better to put all those goodies in than a bag?

This is called What's in Your Bag. I have made a few of these a couple years back and I remembered I really enjoyed them. They come together easily, take very few supplies and are a quick project for some Saturday afternoon sewing! 
Don't worry, the directions are easy to understand, the vinyl is an easy technique so you don't fight with the feet on your sewing machine and the installation of the zipper is a breeze.

The zipper installation even has those cute little tabs, makes it looks so professional don't you think?

I quilted the back of the bag with straight grids, it was just enough quilting to give it some stability to stand on its own.

I really do love how easy these are to make. I also don't think I mentioned you can cut out two at the same time! Two fat quarters makes two bags! So I made one for the swap I was in and one for my secret sewing sister for the Charlotte Modern Quilt Guild.

We have plenty of fat quarters to choose from, if you need any help I'm happy offer advice on which two I would put together! In fact, if you like the fabric I used, you can buy the What's in Your Bag kit; it includes the pattern, fat quarters, zippers, fusible fleece and vinyl for two bags.
Details of the bag:
Pattern: What's in Your Bag
Fabric: Hello Darling by Bonnie and Camille
Kit for sale with fabrics made as shown above
Cute, Simple and Easy - Mini Dwell
In our newsletters we have started to list some of our favorite, quick and easy sewing projects (if you haven't signed up it's not too late to sign up on our website, we have some good stuff coming out in the next few weeks!). Mini Dwell by Thimble Blossoms certainly made the list! If you recall, I recently made a Mini Dwell Zippy for a friend of mine.

Recently we received Farmhouse by Fig Tree, and I have to say it is ahhhmazing! I might even go out on a limb and say it's my favorite line right now!

The Mini Dwell pattern only takes scraps to make, or about 7 charms from a charm pack. If you have read many of my blog posts, you know how I feel about scraps going to waste... so expect to see some more projects using my left overs from my Farmhouse charm pack!

The most time consuming part of this project was just picking out the fabrics for each house. There are so many cute prints in the charm pack, I had a really hard time deciding because I wanted to use one of every print!

I quilted it on my domestic machine with diagonal lines, simple. I quilted them about 1/2" apart, and I have to say it actually went pretty quick.

So there you have it, one of my favorite patterns with my favorite line!
Details:
Fabric: Farm House by Fig Tree
Pattern: Mini Dwell by Thimble Blossoms
Size: Approximately 13" x 15"
LeeAnn's Memory Quilt
A dear friend of mine lost her father last year. This was an incredibly hard time in her life, as her and her father were extremely close. So I knew when she asked me to make a memory quilt of her "Daddy's" shirts there was only one answer!

Her father had some of the best shirts, they were all soft and worn; perfect to make a memory quilt from. A lot of them were flannel, there was even a wool scarf with his initial embroidered on it.

We decided to quilt it with stars and loops, a nice and light design that only gets better with washing!

The blue shirt was my favorite, I knew exactly how I wanted to make it the focus of the quilt. It was also the only shirt she said had to be in the quilt; it was the shirt he passed away in. I was able to squeeze three stars from it, exactly three. There was not a bit of scrap leftover from the blue shirt.


Her father loved yellow roses, so she chose this beautiful fabric from Lulu by Chez Moi. {Bonus for her: Her dog's name is Lulu, so she knew it was just meant to be}

Friend, I'm sorry of the passing of your father. I'm so honored you asked me to make a memory quilt for you, may it keep you warm and the memory of your father always near you.
Caleb's Halloween Quilt
I love Halloween fabric, I always have. It's something about the colors, and the fun designs that always catch my eye! My mom is no different, in fact she is probably even worse than I am about loving Halloween fabric!

She decided she was going to make Caleb a Halloween quilt, since he is in that age of pointing to all the objects he recognizes we thought now would be the perfect time for him to have his very own Halloween quilt.

The fabric is a mix between a variety of Riley Blake prints and a good amount of The Boo Crew (one of my all time favorite Halloween lines!)

Here's a closeup of one of the blocks, we chose Bats as the quilting design. I think the looseness of the design helps not take away from any of the cuteness of the novelty prints.

The backing is all spiders and webs. To be honest, spiders completely freak me out, but this print is so darn cute and it doesn't seem to bother Caleb at all!

That little green print is also tiny spiders, so many of these fabrics were from different lines and manufacturers but go so well together. I feel because of the print in the center block and the same orange print around each block that it really helps your eye to be able to focus and take in all these cute prints.

Details:
Pattern: No specific pattern
Fabric: A variety of fabrics, great to pull from your stash! A lot of these fabrics are from The Boo Crew by Sweetwater
Want us to longarm a quilt for you? Here are just some of the quilts we have longarmed, and we have an easy estimate form to give you an idea on pricing.
UFO Friday - Bonnie and Camille Scrappy Log Cabin Blocks
I find myself excited for Fridays, knowing that I get to spend at least 15 minutes at my sewing machine to work on some UFO's (unfinished objects). I'm excited to say I finished my Jellybean Boathouse quilt last Friday, so now I get to choose a new UFO! Get caught up on my UFO mission.

I've decided I would really like to finish my Scrappy B & C Log Cabin Quilt. While this quilt may not be all that old compared to some of my other UFO's, I'm really looking forward to using it this winter! I enjoy looking at each block and thinking about the time that someone else spent sewing log cabin blocks that are going to be in my quilt!

This was an Instagram swap, the person who organized it did a fantastic job! Each person who joined the swap made a 21" x 21" scrappy log cabin block made only out of Bonnie and Camille fabrics, which was then cut into four blocks 10.5" x 10.5". You kept one quarter from each of the blocks you made and then sent off the rest to be distributed to everyone else. Once all the blocks were received she did her magic swapping and mailed them back. I think we ended up with 32 blocks for our quilt!

She was so organized, and generous with her time. I know it must have taken her forever to receive everyone's blocks, log them, swap them and mail them back! I sure did have fun, and I really like the look of the quilt. Can't wait to start making some progress on this one!
Don't forget, you can join in on the fun! Post your photos on Instagram or on our Facebook page, use hashtag #UFOFridays
Project details:
Pattern: Scrappy Log Cabin
Fabric: Every and any collection from Bonnie and Camille