Strip Quilt Featuring Moda Scrap Bags Tutorial
Please tell me you have used a Moda Scrap Bag! No? Not sure what a Moda Scrap Bag is? Let me explain!
Moda Scrap Bag
A Moda Scrap Bag is a bag full of Moda fabrics that don't make the cut for precuts or yardage. Think of them as remnants after cutting all their precuts.
Here are the deets:
- They come as strips
- Usually from the same line of fabric, but if not they will coordinate well together
- Usually about 1/2 lb or fabric
- Usually has selvages you'll end up having to trim off (you may get lucky and get no selvages!)
- Usually the strips are anywhere from 1" - 3" in width after you cut the selvages off
- Usually strips measure 32" long
Not sure what to do with a scrap bag? I have a tutorial for this Half Square quilt, or see below for another easy, quick finish.

Quilt finishes at 37" x 37"
(Dimensions could change depending on how many strips come in your scrap bag, and what size your strips are cut into)

Materials needed:
- (1) Moda Scrap Bag
- (1 1/4 Yd) Backing
- (1/3 Yd) Binding
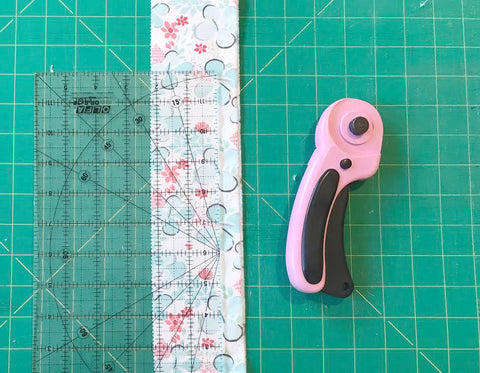
Step 1: Take the strips out of the bag, find the strip with the smallest width
Take all your strips out of your bag, find the strip width that is the most narrow.

Step 2: Cut all strips the same width
Cut all strips the width of your most narrow strip
Step 3: Match your strip to a coordinating print
Match your strip to the print you want it sewn next to, I matched all my strips at the same time

Step 4: Sew each pair
Each strip that you have matched together, sew them right sides together using a 1/4" seam. Press seam to one side.
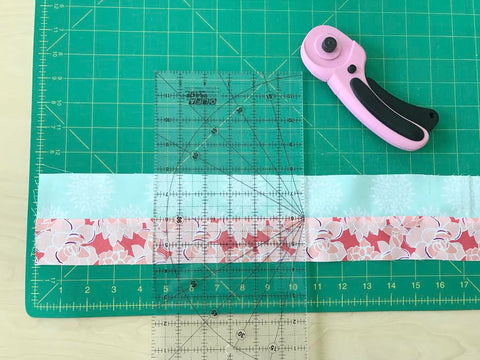
Step 5: Cut strips into thirds
Cut sewn strips into thirds. My strips measured 32", so I cut my strips into 3 sections that measured 10.5". 
Step 6: Sew the three sections together
Step 7: Cut block in half
Cut down the center, since my block measures 10.5" wide, I cut my block into two 5" sections

Step 8: Sew both blocks together
Flip your two blocks and sew them together.

You now have one block complete! Repeat steps to complete the remaining strips you have matched up. Layout as desired, ta da! That's it, your quilt top is complete. You could add on some borders, or purchase two coordinating scrap bags to make the quilt larger. These are all the strips that came in my scrap bag, I rather like the size as it's a perfect size for a baby quilt.


Want us to longarm a quilt for you? Here are just some of the quilts we have longarmed, and we have an easy estimate form to give you an idea on pricing.
Tutorial - Hour Glass Block
Hey everyone! Have you ever seen those Moda turnover precuts before? Wondering what a turnover is? They are actually layer cakes cut on the diagonal. Are you thinking, I would never buy one of those because I have no idea what to do with it? I'm here to help you, I made an hour glass quilt with mine and I'm here to post a tutorial on how I did it just for you!
Quilt finishes at 43" x 59"

Materials needed:
- (1) Turnover Moda Precut, I chose the Color Me Happy by V and Co.
- (1 1/2 Yd) Background, I used a Bella Solid
- (1/2 yd) Binding, I used Big Sky by Amy Brady
- (2 3/4 yds) Backing, I used Simply Color by V and Co
Step 1: Cut your background into 10" squares
You'll need (20) 10" squares of a background (grey in my case), then cut them on the diagonal
Pair up each background triangle with a print triangle from your turnover precut

Step 2: Sew the background fabric to the print fabric
Right sides together sew your background with print fabric, press your blocks (I pressed my seam to the solid side)

Step 3: Trim the half squares
Trim all half squares to 9 1/2"

Step 4: Draw a line down the center of the half square triangles
Pair up the half squares you would like sewn together as your hour glass block, draw a line down the center of one of the blocks you will be pairing together (there should be 20 blocks you'll be drawing a center line on)

Step 5: Match up the seams on the two half squares
Match up the seams on the two half squares so they lock in place, I pinned on the seam to keep the blocks stable when sewing down the bias (the line that was just drawn in step 4 is on the bias)

Step 6: Sew a scant 1/4" on each side of the line
Step 7: Cut down the center of the drawn line
Cut down the center line and press each block

Step 8: Square up each block
Trim each block, I squared mine to a 9" square
That's it! Now layout as desired and you have yourself a new quilt top done in record time!


Want us to longarm a quilt for you? Here are just some of the quilts we have longarmed, and we have an easy estimate form to give you an idea on pricing.
UFO Friday - Block of the Month Houses
Our store offered a block of the month a little while ago, and while I was really good at completing the monthly blocks, I never did anything with them! I'm not sure why, as they are so cute!

So I decided to go ahead and finish this one up using my UFO Fridays!

It literally took me 15 minutes to get it all pieced together, I'm not sure why I procrastinated so long! It was so easy going together, I already did most of the work by paper piecing the blocks, so sewing the blocks together was a breeze.

Every block is so unique, I was able to choose a little bit of every color group making the end result such a vibrant look.

This little house is one of my favorites (although it is hard to choose!), I think the midcentury modern look is what gets my attention, nice clean lines and of course those are my favorite.

So here it is, all finished up!

We still have a few kits remaining, once they're gone they're gone... a lot of this fabric has been sold out for months. The kit comes with the pattern, fabric for the whole top and the border of your choice.
Next up on my UFO list, a Chantilly quilt I started about three years ago. I had finished the blocks at a retreat I went to recently, and need to finish piecing the top.

It feels so great getting some of these projects wrapped up. Are you working on any UFO's?
Don't forget, you can join in on the fun! Post your photos on Instagram or on our Facebook page, use hashtag #UFOFridays
Project details:
Pattern: Houses by Johanna Masko
Fabric: Favorites we hand selected from the store
A few Houses kits are still available!
Status: Finished!
UFO Friday - Tinker Tote Finish
Guess what?! I finished up my Tinker Tote! What a great feeling to get another project off the list, and I actually brought it and used it while shopping at the Farmers Market already!
If you're new here, UFO Fridays are where you carve out 15 minutes of your day to work on a UFO (Unfinished Object), with the objective of finishing it up! I work on the same UFO every Friday until it's finished.
You can find all the previous details to my Tinker Tote here: The Start of the Tinker Tote and Tinker Tote Continuation.
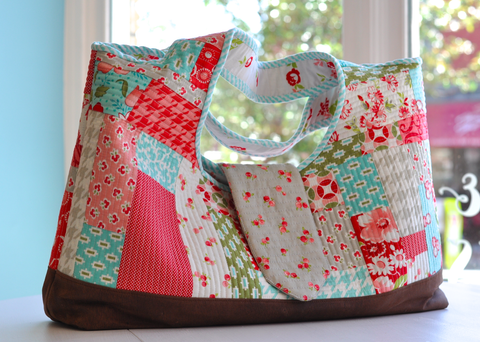
Besides the quilt as you go technique, the rest of the bag went together pretty quick! It would be a great scrap buster project!

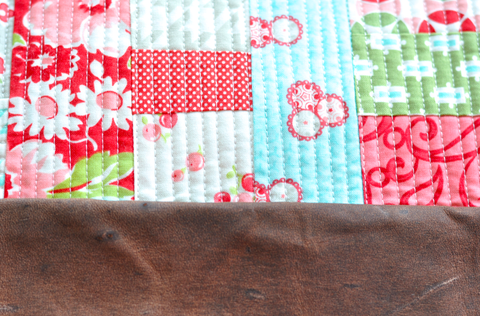
I used leather for the bottom of my bag, I actually bought it from Ebay. I'm not a pro on purchasing leather, I'm not even sure I got a good deal on mine but I sure do love it! It has a nice soft feel, and more importantly is a light weight leather so it wasn't hard for my machine to sew through! I have enough little scraps that you'll probably be seeing accents on my next zippy pouches.

I really did enjoy the project, so much so that I'm not denying the fact I'll probably be making another one soon.
My next UFO will be the Block of the Month Houses we did some time back. While I finished all the blocks, I never sewed them together!
Don't forget, you can join in on the fun! Post your photos on Instagram or on our Facebook page, use hashtag #UFOFridays
Project details:
Pattern: Tinker Tote
Fabric: Ruby (original) and Vintage Modern by Bonnie and Camille
Status: Completely finished!
UFO Friday - Tinker Tote Continuation
I got to put a little time in and work on my tinker tote today! I didn't get too far, but progress is progress, am I right??
If you're new here, UFO Fridays are where you carve out 15 minutes of your day to work on a UFO (Unfinished Object), with the objective of finishing it up! I work on the same UFO every Friday until it's finished.
This is my second week working on the tinker tote, you can view the previous post The Start of the Tinker Tote to get caught up on the details.

I was able to cut out and interface my lining (I just love this print by the way!!), and sew on my inside pocket. I actually had just the perfect sized scrap to use as my pocket, it happened to be flannel. It's sooooo soft!

I also was able to install the zippered pocket and install the magnetic snap on the flap. I should be able to get the whole tinker tote completed next Friday!
Next up, sewing on the leather bottom, inserting the lining, putting on the flap and stitching on the binding. I can hardly wait for next Friday!
Don't forget, you can join in on the fun! Post your photos on Instagram or on our Facebook page, use hashtag #UFOFridays
Project details:
Pattern: Tinker Tote
Fabric: Ruby (original) and Vintage Modern by Bonnie and Camille
Status: Quilt as you go process completed, lining cut and interfaced, pockets sewn, magnetic closure sewin on flap
UFO Friday - The Start of the Tinker Tote
So it's been entirely too long since I have worked on UFO Friday! Today it changes, I'm back at it. I haven't been completely neglecting my UFO's (unfinished object) I did actually finish one, but since I didn't show you the before, there's no point in posting the after right? I may show you just for fun after it's quilted!
If you're new here, UFO Fridays are where you carve out 15 minutes of your day to work on a UFO (Unfinished Object), with the objective of finishing it up! I work on the same UFO every Friday until it's finished.

The next designated UFO is my Tinker Tote. I'm afraid to tell you how long ago I started it, you could figure it out if you look at the two fabric lines I chose from Bonnie and Camille back in the day.

So I just finished the quilt as you go process. A cool technique, easy for anyone to do... it does take some time and a little bit of effort though. The smaller the pieces, the more scrappy it looks; also the more time consuming it is to do (I also used 1/4" quilting so that doesn't help my case).
Next up, inserting lining, sewing on the leather bottom and putting in a magnetic snap... then just like that I'm done, in a snap (or knowing me, a few UFO Friday's from now).
Don't forget, you can join in on the fun! Post your photos on Instagram or on our Facebook page, use hashtag #UFOFridays
Project details:
Pattern: Tinker Tote
Fabric: Ruby (original) and Vintage Modern by Bonnie and Camille
Status: Quilt as you go process completed
Allie Owl
We made the cutest quilt a few weeks ago and I had to share! This little sweetie is called Allie Owl, the pattern is by Elizabeth Hartman. I was so pleased with how fast it came together. I would certainly make more of them!

I love how the eyes have that strong frown like owls do, and the "feathers" on the breast are in different colors. It's an understatement to say it's a favorite of mine!

The quilting design we chose is called "Pinwheel 4", I love that the simplicity of the quilting shows up in all the negative space but doesn't detract from the quilt.

Did I mention we have kits? I just couldn't help myself, I want everyone to join in the fun with me! Did you know that when you purchase a quilt kit from us, and return the top to be longarmed that we give you 10% off your quilting?
Here are the quilt stats:
Pattern: Allie Owl by Elzabeth Hartman
Size: "Baby Quilt" 32" x 44"
Fabric: Assortment of Bella Solids
Quilting Desig: Pinwheels 4
Kit: Allie Owl Kit
Want us to longarm a quilt for you? Here are just some of the quilts we have longarmed, and we have an easy estimate form to give you an idea on pricing.