Economy Block Quilt Along
Have you seen any of those adorable economy blocks? I first saw them on instagram (if you're on instagram, make sure to say hello to me! My username is jennthurston ) and couldn't believe how cute those blocks were!
Red Pepper Quilts has a paper pieced pattern as well as directions for traditional piecing. Make sure to check out her site, the colors she selected are so vibrant!
I decided to use the paper piecing method instead of the traditional route. We sell this awesome light weight paper called Carol Doak's Foundation Paper for paper piecing, it can be put through the printer or traced. I absolutely love it and use it whenever I paper piece!

I also decided on using my scraps since I have so much of them! These are my first four blocks -

I can't wait to make more, I'll have to make a whole lot of economy blocks to use up all my scraps!
Jenn
Boho Tidibit
Have you tried one of the Little Bites patterns from Miss Rosie's Quilt Co.? They are so much fun! All of the Little Bites feature using Moda Candies (if you're not familiar with them, you must check them out, they are a smaller, oh so cute version of a charm pack measuring 2.5" x 2.5").

This quilt is made from the pattern called Tidbit. She features three different versions of the pattern. I made the top one, but decided to add colorful borders instead of the solid background color.

The little candie pack was so fun to use, I usually don't make small quilts but I really enjoyed this one! Her techniques were great, and really cut down on individual piecing.

Here's a picture of the back. So, a fatquarter isn't quite large enough for a backing... sooooo I cut what little scraps I had remaining and used them to splice the back to make it just big enough (and boy do I mean just big enough!). Don't get me wrong, I love scraps and making more projects from them, but I feel so accomplished when I can use all the fabric I have in one quilt!

So there you have it, you must put it on your list of adorable small quilts to make!
Jenn
Hip Holiday Comes to Town
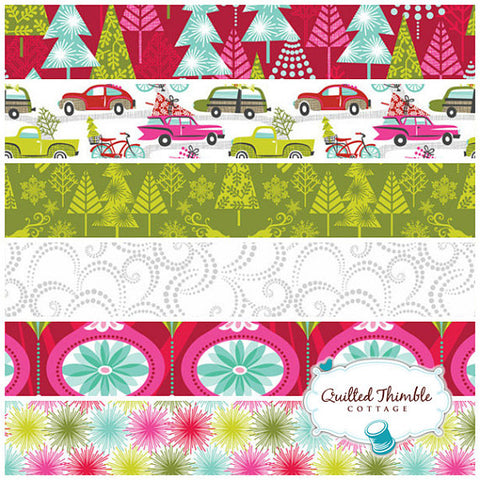
We just got the cutest Holiday fabric in, yes I said Holiday as in December time frame... I know, I know, it's a little early to start thinking about the Holidays. But I'm telling you what, this fabric is so stinkin' adorable that if you don't start thinking about it now - it WON'T be here when you're ready for it!

We purchased the whole line, which is called Hip Holiday for Blend Fabrics.

This is one of those lines that every single print is just too cute to choose from! We did go ahead and set up two listings of fat quarter bundles if you needed a little help choosing!

The car print is my favorite, so of course I had to put those in both bundles!
I hope you like it as much as I do! I can't wait to make a store sample, that may end up finding it's way back to my house...
Jenn
Itsy Bitsy... Pieces
I'm not known for small piecing, I'm more of an instant gratification type of girl. But I just couldn't resist busting open one of these Boho candies!

Aren't they adorable? We have a whole assortment of mini charms, more and more lines are coming out with them. If you haven't had the opportunity to work with them, they sure are fun! 42 squares in a pack (just like a charm pack), but these little guys are only 2.5" x 2.5". Check out the mini charms we have available, it's hard to choose between them all!

Those little pieced squares are only 2" x 2", maybe not the smallest blocks out there but they sure are cute! I'm only about half way done...

Make sure to check back to see how this little mystery quilt turns out! I'm hoping to be done with the top this week if all goes according to plan.
Jenn
Selvage Coasters - A Quick How To
Ever wonder what to do with your selvages? I was in desperate need of some coasters, so I thought why not make them a little interesting!

Here's a quick and informal tutorial on how to use your selvages to make coasters. I began by taking some scrap fabric or muslin and cut them into 5" squares.

Take a ruler, line up the 45 degree line with the corner of the 5" square. Mark with a pen (I used a Frixon pen, but you could use something permanent since the selvage will be covering up the line).

Grab a handful of those selvages you've been hoarding (come on, no point in denying it....). I only used 7 or 8 different strips, they stretch surprisingly far!

Place the first selvage aligning the top with the line you just marked.

Place the next selvage above the first selvage (both selvages facing up), overlapping slightly so that when the top stitch line is sewn both selvages are sewn down. Stitch close to the edge of the lower portion of the second selvage.

Continue to layer the next selvage in line slightly above the selvage just sewn, stitch close to the edge making sure both selvages are sewn down with that stitch line.

Continue until the whole square is completely covered with selvages. Here is a picture of the front and back. That's it, now all you have to do is cut them into the desired size (I used a final size of 4.5" x 4.5"), make a quilt sandwich with backing and batting, quilt as desired and bind!

Who couldn't use some new coasters?? I know I did!
Jenn
Happy Go Luck in the Store
Check out Bonnie and Camille's newest line Happy Go Lucky. Every line they come out with I think "this is my favorite one", then they out do themselves on the next line! This one is exceptionally nice because they added a navy to make a pop of color. I made a sample quilt for our store using two charm packs and some white fabric. The quilt pattern can be found in the book Fresh Fabric Treats, very easy and fun to make.

So fun in fact, that I used the few charm squares I had remaining from the quilt to make a pillow. For the pillow cover I cut the charms into 2.5" squares and used the same wonky star technique. Like I said really fun to make, I'm sure this is not the last wonky start object you'll see from me!
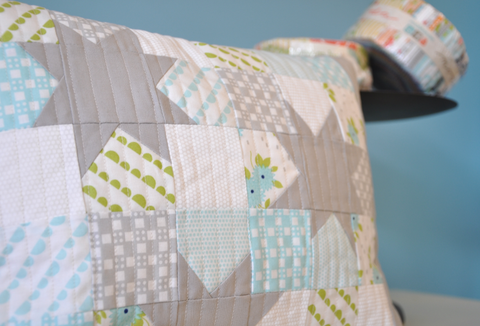
The colors in this line are so stunning, yellow, navy and of course red and aqua.

You really must check it out soon, with a line this delicious it will certainly be gone soon!
Jenn
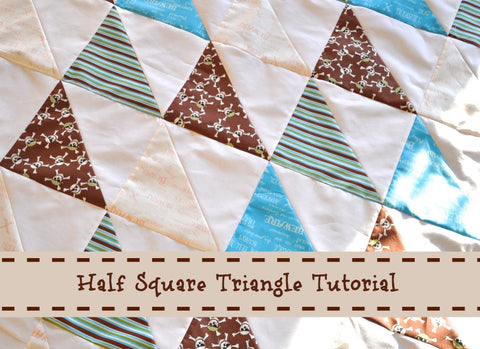
Half Square Triangle Tutorial
I'm sure almost everyone out there in the quilting world already knows how to make a half square triangle block. There's nothing fancy to making one, but they are in oh so many beautiful blocks! So if you don't know how to make them, today is your lucky day! I was making another quilt to add to the collection for our Charity Quilts, and thought a half square quilt would be a really quick and easy quilt to make. Here's a quick tutorial on how to make half square triangle blocks.
Details of our quilt:
Size: 43" x 52"
We used four different colors (if you like the fabric we used, it's called Pirates by Riley Blake, such a cute boy quilt fabric which can be so hard to find sometimes!)
Colored Blocks: One 10" strip WOF (width of fabric) of each four colors. Cut these into 10" x 10" blocks, you will have a total of four 10" x 10" squares of each color.
Background Blocks: 1 1/4 Yard. Cut 16 10" x 10" squares.

- Mark a diagonal line down the center of the background blocks.
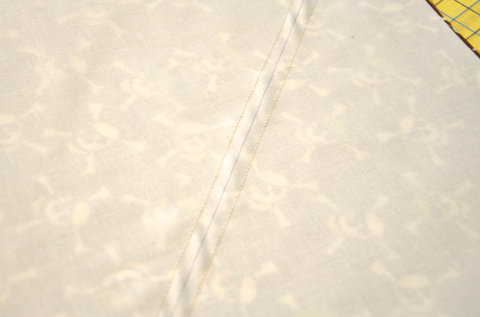
- Sew a 1/4" seam down both sides of the line you just marked.

- Cut on the center line.

- Press the seam towards the dark fabric.

- Align the diagonal line of ruler on the diagonal sewing line, trim the top and right side of the block.

- Flip the block to trim the other two sides, we trimmed our block down to a 9" block.

There you have it, it's that easy to sew and trim half square triangles! Now you just need to decide on your quilt layout, which may sound easier than it really is with all those choices... diamonds, chevron, diagonal lines... so many layout choices!
Jenn